Detecting Clean-vs-Messy Rooms
using TensorFlow Deep Learning
This guide will walk you through the steps to create and use a TensorFlow machine learning model to detect a clean room vs messy room.
In our house, we integrate such a model with our home automation system to block access to the TV used for video games if the kids have not kept their rooms clean.
Note that this process could actually be used to a create a model to recognize any type of objects/scenes in images - not just a clean or messy room.
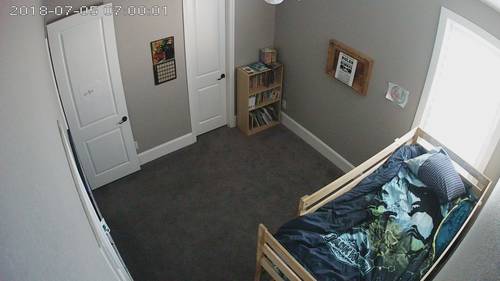
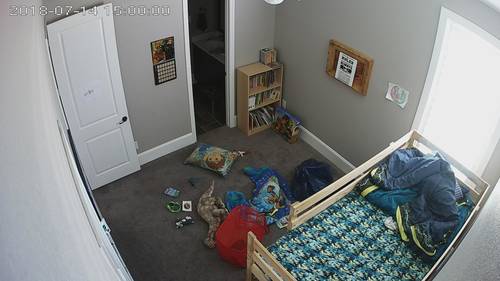
Step 1 - Collect a wide variety of training data (images of the room)
Here are some guidelines for the training data:
- Try to collect at least 100 images of each type (clean, messy)
- The images should be as "diverse" as possible - e.g. different types of messy, different lighting, etc.
- Try not to duplicate very similar images in the training data
- The more training data you feed the model, the more accurate it will become (you can probably get away with starting with a smaller set of images, and then retrain as you obtain more).
For our use case, I set my security cameras to archive a photo of the rooms (boys room, kitchen, upstairs play room), at a one hour interval. Then I would go through and delete any that looked too similar, and then sort the remaining photos for training the model.
Here's an example of the scheduled cronjob that snapped the hourly photos:
# Get training data from security cameras for Jarvis:
0  * *  *  *  matt  wget "http://192.168.1.21/snapshot.cgi" -O /tmp/boys/$(date -u +"\%Y\%m\%d_\%H_\%M_\%S").jpg
0  * *  *  *  matt  wget "http://192.168.1.23/snapshot.cgi" -O /tmp/kitchen/$(date -u +"\%Y\%m\%d_\%H_\%M_\%S").jpg
0  * *  *  *  matt  wget "http://192.168.1.25/snapshot.cgi" -O /tmp/upstairs/$(date -u +"\%Y\%m\%d_\%H_\%M_\%S").jpg
After your photos have been pruned and sorted, they should be organized in a file/folder structure as follows:
/path/to/files/room           -- parent directory
/path/to/files/room/messy/    -- messy pics
/path/to/files/room/clean/    -- clean pics
It may take several weeks of collecting photos before you're able to amass an adequate level of diversity and quantity for training an effective model.
Step 2 - Install TensorFlow and Download Helper Scripts
TensorFlow is easy to install using Python's pip utility. Additionally, you'll need to get two python scripts from the TensorFlow github.
$ sudo apt install python-pip
$ pip install "tensorflow>=1.7.0" --user
$ pip install "tensorflow-hub" --user
$ mkdir ~/tensorflow
$ cd ~/tensorflow
$ curl -LO https://github.com/tensorflow/tensorflow/raw/master/tensorflow/examples/label_image/label_image.py
$ curl -LO https://github.com/tensorflow/hub/raw/r0.1/examples/image_retraining/retrain.py
If you run into any strange errors during the steps above, try searching for the error message on Google.
Step 3 - Train the Dragon Model
We can now issue the necessary TensorFlow command to take an existing deep learning model, and 'retrain' it to recognize our images (aka transfer learning).
The commands below will use the Inception V3 neural network architecture pre-trained on ImageNet:
$ cd ~/tensorflow
$ python retrain.py \
    --image_dir /path/to/files/room \
    --output_graph=rooms.pb \
    --output_labels=rooms.txt \
    --tfhub_module https://tfhub.dev/google/imagenet/inception_v3/feature_vector/1
The training process should take anywhere from 15-60 minutes depending on your processor. It does cache some of the data it generates; so if you ever retrain using some of the same images, it will be faster than the first time.
The newly generated files rooms.pb and rooms.txt represent the model and labels that will be used to recognize images (rooms) as messy or clean.
Step 4 - Recognize Your Images!
The label_image.py script we downloaded in Step 2 can now be used to "score" (recognize / classify / label) new images using the model we trained in Step 3:
$ cd ~/tensorflow
$ python label_image.py \
    --graph=rooms.pb \
    --labels=rooms.txt \
    --input_layer=Placeholder \
    --output_layer=final_result \
    --image=/path/to/new_image.jpg
If everything worked, you should see a bunch of debugging information that finally ends with a "score" -- which represents the model's confidence on a scale of 0 to 1 of its classification of your photo:
messy 0.894276
clean 0.105724
The example above shows that the model is 89% confident that the image provided is of a messy room (and only 11% confident that it's clean).
As mentioned in the overview above, you could use Steps 1-4 to create many classifications beyond a clean / messy room; which would result in a longer list, such as:
basketball 0.99071
soccerball 0.00595
baseball 0.00252
rugby_ball 0.00049
volleyball 0.00032
Step 5 - Integrate and Put Your Model to Work
Now that you have a working model, it's up to you to integrate it with your own personal workflow and requirements.
In my case, Jarvis uses the following command to obtain the % confidence of a clean room, and then acts accordingly:
{ python label_image.py \
  --graph=$MODEL.pb \
  --labels=$MODEL.txt \
  --input_layer=Placeholder \
  --output_layer=final_result \
  --image=$TMP_IMAGE; } 2>&1 \
   | grep "clean" | cut -d ' ' -f2 | awk '{printf "%.0f\n", $1*100}'
Appendix & References
The steps above outline a very quick and basic approach to meet the needs of this simple use case. If you would like to dive into the details and learn how to tweak your model(s) for performance and accuracy, please see the reference links below:
- TensorFlow Image Retraining Tutorial
- TensorFlow Image Retraining CodeLab
- Transfer Learning: retraining Inception V3 for custom image classification
Also note...
- It's a good practice to "hold back" several images from your training set that you can then use to test your model after it's trained.
- Here is a link to a shell script I created to help me manage the usage, testing, and training of my model.
- In the tutorial above, we used the Inception V3 neural network module. There are many other modules that offer a different mix of performance vs accuracy. Some are especially suited for mobile apps.
- If you have an NVIDIA GPU, you can install 'tesorflow-gpu' instead of the regular 'tensorflow', which will leverage your video card to do the training -- and consequently go much faster. However, you must first configure all the prerequisites.
- Random distorations can be used during training to increase your model's accuracy. However, they take significantly longer and should probably only be attempted when using your GPU for processing.